Daisy Picot Snowflake
I have not made anything with daisy picots for a while and was wondering if I still remember how to do it. I searched Riet's blog for the instructions because I first learned it from her, but I couldn't find it there anymore. I have lost the paper with the instructions that I printed earlier. So, working from memory, I managed to produce this simple snowflake.
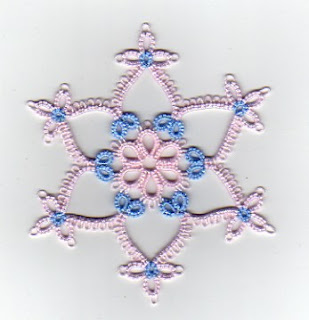
And, so that I'll know where to find it again, I am putting up a how-to for the daisy picot, using the instructions for this snowflake as a working sample.
First, the pattern for the snowflake -
Wind two shuttle with different colour thread for each shuttle.
The centre Daisy - 6 rings altogether.
R(5-3-2-2-3-5). You can make the centre picot slightly bigger for decorative purposes.
R(5+3-2-2-3-5), joining to the last picot of the previous ring.
The last ring is joined to the previous ring and also to the first ring with the folded join.
Round 1
R1(6+6), joining to the 3rd free picot of any of the rings in the centre daisy.
R2(6+6), joining to the 1st free picot of the next ring of the centre daisy.
Reverse work.
Make a chain C(2-2-2-2-2-2-2-2) Do not reverse.
(*)Now make the daisy picots with 3 petals, where each petal is (5-5) and 2ds between each petal.
Close the ring, do not reverse and repeat the chain.
Reverse work and repeat the two rings of R(6+6), joining the 1st ring to the 3rd free picot of the previous ring and the 2nd ring to the 1st free picot of the next ring of the centre daisy.
Reverse work and repeat the chain (2+2-2-2-2-2-2-2), joining to the last picot of the previous chain.
Repeat from (*) to complete the snowflake.
And how to make the dasiy picot -
1. After making the first chain, do not reverse work. Loop the thread from shuttle 1 (blue) round the fingers and make 2 ds. Drop shuttle 1 but keep the loop round the fingers.

2. Now. flip the chain so the the picots are now facing to the right. Here, you can see that the thread of shuttle 2 (pink) that makes the ds of the chain is on the right.

3. With shuttle 2 (pink thread) make an unflipped ds onto the loop thread, starting with the 1st half like the normal ds, followed by the 2nd half.


The completed set of 5 ds on the loop thread should look like this.

Complete the first daisy picot with (5-5). Make sure the ds are snugged up close before starting the next step.
4. Bring the thread of shuttle 2 (pink) to the left. Now pick up shuttle 1 and make two more ds (flipped) onto the loop thread. Bring these two ds close to the first two ds and you can see the first petal of the daisy formed. To test whether you are making it right, pull the thread from shuttle 1. If it slides, then you are on the right track.

5. Repeat step 3 and 4 for two more petals of the daisy picots.

6. Finally, close the ring by pulling the blue shuttle thread. You can see the that the blue ds forms the shape of a tiny ring and the rings made by the pink thread are like picots to this tiny blue ring.

I hope you find this beautiful technique useful and I want to thank Riet for showing me how to do it in the first place.

And, so that I'll know where to find it again, I am putting up a how-to for the daisy picot, using the instructions for this snowflake as a working sample.
First, the pattern for the snowflake -
Wind two shuttle with different colour thread for each shuttle.
The centre Daisy - 6 rings altogether.
R(5-3-2-2-3-5). You can make the centre picot slightly bigger for decorative purposes.
R(5+3-2-2-3-5), joining to the last picot of the previous ring.
The last ring is joined to the previous ring and also to the first ring with the folded join.
Round 1
R1(6+6), joining to the 3rd free picot of any of the rings in the centre daisy.
R2(6+6), joining to the 1st free picot of the next ring of the centre daisy.
Reverse work.
Make a chain C(2-2-2-2-2-2-2-2) Do not reverse.
(*)Now make the daisy picots with 3 petals, where each petal is (5-5) and 2ds between each petal.
Close the ring, do not reverse and repeat the chain.
Reverse work and repeat the two rings of R(6+6), joining the 1st ring to the 3rd free picot of the previous ring and the 2nd ring to the 1st free picot of the next ring of the centre daisy.
Reverse work and repeat the chain (2+2-2-2-2-2-2-2), joining to the last picot of the previous chain.
Repeat from (*) to complete the snowflake.
And how to make the dasiy picot -
1. After making the first chain, do not reverse work. Loop the thread from shuttle 1 (blue) round the fingers and make 2 ds. Drop shuttle 1 but keep the loop round the fingers.

2. Now. flip the chain so the the picots are now facing to the right. Here, you can see that the thread of shuttle 2 (pink) that makes the ds of the chain is on the right.


The completed set of 5 ds on the loop thread should look like this.

Complete the first daisy picot with (5-5). Make sure the ds are snugged up close before starting the next step.

5. Repeat step 3 and 4 for two more petals of the daisy picots.

6. Finally, close the ring by pulling the blue shuttle thread. You can see the that the blue ds forms the shape of a tiny ring and the rings made by the pink thread are like picots to this tiny blue ring.

I hope you find this beautiful technique useful and I want to thank Riet for showing me how to do it in the first place.
Jon, this snowflake is absolutely lovely! Thanks for the pattern and instructions. Time to learn something new.
ReplyDeleteP.S. You've been tagged. Go to my blog for instructions.
This is very pretty! Thank you for the clear directions and pictures!
ReplyDeleteOH MY!!!! This is wonderful....
ReplyDeleteI have problem reading 'words' pattern... However, will figure out... Otherwise, I'll ask u... hehehehe
Cheers,Jul
I've been reading and reading the patterns... Wooo.. I can't wait to try... Hopefully I can do it...
ReplyDeleteThis is lovely and I can't wait to try it!
ReplyDeleteJon, I tag YOU. Please go to my blog to find the rules. http://threadsofatattinggoddess.blogspot.com/
ReplyDelete:-) Gina
This is so beautiful! Thank you for posting the instructions.
ReplyDeleteLovely work, Jon. Your tatting is beautiful and so is this pattern.
ReplyDeleteNow THAT'S eye candy!
ReplyDeleteJust gorgeous! ...and you show how you did it.
Where do you get all your beautiful thread? Wich brand? Can I get it online?
ReplyDeleteI've stumbled across your blog by accident, and I'm glad I did. Your patterns are wonderful and I absolutely love your daisy picot snowflake
ReplyDeletethx for sharing this technique + creating a pdf file ; )
ReplyDeleteEncontre tu blog por casualidad, y estoy fascinada con tus trabajos,preciosos.Gracias por los patrones e instrucciones, muy claras,y por compartir tus conocimientos.
ReplyDeleteI have just started learning to Tat and may I say that I am very proud and happy to see a fellow Malaysian sharing patterns and tatting away, not to mention that you are not too far away from where I live too. Good job, Kak Jon!
ReplyDeletelove your work and pictures u always do such nice work
ReplyDeletegorgeous!
ReplyDeleteI would love to try this.
ReplyDeleteNice job on the tutorial for the daisy picot. I tried it and got it right away with your clear instructions. Thanks!
ReplyDeleteCan I make this pattern using needle tatting?
ReplyDeleteThank you so much for sharing your beautiful work! You are an excellent teacher! My daisy picots were more like a tangled mess until I found your instructions. Your clear descriptions and excellent photos helped me to get them right, and now they look pretty!
ReplyDeleteIt is so beautiful, I can't wait to try it. Thank you for the pattern.
ReplyDeleteSo beautiful and sweet!
ReplyDeleteGracias por compartir este trabajo tan bonito.
ReplyDeleteMe encanta! me pondré a practicarlo, porque las explicaciones son muy claras.
Hello Jon,
ReplyDeleteI just saw the snowflake it is wonderful Is it OK with you that I use the pattern for the Dutch tatters? They can tat it for the Christmas tree Hope to hear from you
Riet the B-engel